The scene has been set, now it’s time for us to find out what was made and how to make it; my favourite part! The first recipe share from my Mother’s Day lunch is Janine’s homemade bread and vetkoeks. Janine and her Mom, Marty, had me over for a Sunday afternoon and taught me first-hand how to make their family’s homemade bread and vetkoeks. When people share their family recipes with me, I feel like I have been let in on a big secret that I have to share with the world… only because it would make it a better place.
Acknowledgement: Pictures were taken by Janine Shepard from Jinx Photography
After making and tasting it then, I was glad to see Janine bring it along to our lunch. Vetkoek and mince is a hearty traditional South African meal, and homemade freshly baked bread is a winner in any country! You can choose to make both dishes, or you can make one. This recipe is versatile and the process and ingredients to make the dough for either one is the same. I do need to warn you though; when you decide to make it you better have arms of steel ready to knead and fold. You also need to set aside an afternoon or a good part of your morning to have enough time to go through the dough making process.
Try this recipe out, not only will your Mom be impressed that you went to all this effort, but she’ll love the taste and texture!
Vetkoek
Ingredients
500g Cake Flour
2 Tbs Sugar
1 tsp Salt
½ Sachet of yeast
½ Jug of luke warm water
1 Cup of oil, on the side. (to coat hands)
375ml Oil, for frying (for the vetkoek)
Note: Double the ingredients if you want to make the bread and vetkoek at the same time.
Instruction:
For the dough
1. Take cake flour and sieve it into a big deep bowl.
2. Add the sugar, salt and yeast.
3. Make it hollow in the middle of the bowl by pushing the flour to the sides.
4. Add the luke warm water slowly, only a bit at a time. Add the water until the flour and dry ingredients turn into a doughy consistency.
5. Then rub your hands in the oil. Every part of your hand has to be covered.
6. Coat the bottom corner of the bowl with a tablespoon of oil so that the dough doesn’t stick.
7. Knead the dough; take the dough from the outside and push it inwards into the middle and push down.
8. Keep folding the dough until you can see a ball forming. This will take ten minutes.
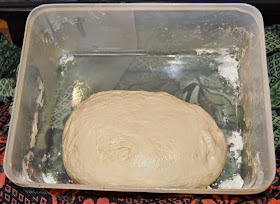
9. Turn the dough into a ball, once in a ball, flip it upside down in the bowl, cover the dough in the bowl with two or three blankets and store aside in a warm place in your house.
10. Leave to rise until three times its size (for about an hour)
11. Once triple its original size, oil your hands and knead the dough again until it is a ‘small’ ball again.
12. Cover the bowl again and store in a warm place for another hour until.
13. Repeat steps 10 - 12 once more; you want to ideally do these steps three times.
14. After your last round of kneading the dough, you can start making the vetkoek.
To fry the vetkoek:
·
Oil your hands again and separate the dough into
small balls.
·
Heat the oil for frying.
·
When the oil is hot, take the dough balls and
stretch it until the dough is flat; depending on the size of your pot, place the
flattened dough pieces at a time in the hot oil. (Do not flatten the dough with
a rolling pin).
· When the side of the
dough is golden brown, turn it to brown the other side.
·
Each vetkoek should cook approximately three
minutes on each side. Each side has to be golden.
Serve with jam or savoury mince.
Homemade Bread
After your last round of kneading the dough, you can place your dough in a bread baking tin.
To make the bread:
·
Preheat oven to 180 degrees.
·
Grease your bread pan and fill half the bread
pan with the dough. (If you need to break up dough into chunks to fit the bread
pan you’re using, then make sure you fold the separate pieces together until
it is one dough before placing in the bread pan.)
·
Bake for an hour or until golden brown on the
top. Use a skewer to test and if the blade comes out clean then the bread is
ready.
·
Once the bread is ready, take it out the oven
and coat it lightly with milk to keep the crust crispy.
·
Wrap the bread with a tea towel and leave to
cool.
·
Once cool you can serve the bread.
Note: Once baked, the bread will keep for a day; homemade bread does not have any preservatives to keep it fresh for longer. So
make this on the day you plan to eat it.


No comments:
Post a Comment